Sunday, 28 January 2018

What is NullIf() in Sql Srever

NullIf(expression1,expression2)

If both expressions values are same then return Null otherwise return first expression values.


create table Store
(
 Id int identity(1,1),
 Store varchar(50),
 Actual int,
 Goal int
)

insert into Store(Store,Actual,Goal) values('StoreA',50,50),('StoreB',40,50),('StoreC',25,30)

Id Store Actual Goal
1 StoreA 50         50
2 StoreB 40         50
3 StoreC 25         30

Query -

select Store, nullif(Actual,Goal) 'CheckNullIf' from Store

Output -

Store CheckNullIf
StoreA NULL
StoreB 40
StoreC 25

What is partial class in c#

Introduction

In this article, I explain partial classes in C# language with an example. A partial class splits the definition of a class over two or more source files. You can create a class definition in multiple files but it will be compiled as one class.
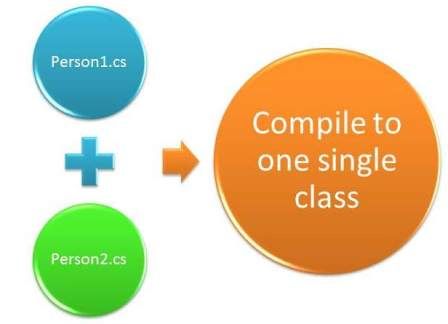
Suppose you have a "Person" class. That definition is divided into the two source files "Person1.cs" and "Person2.cs". Then these two files have a class that is a partial class. You compile the source code, then create a single class. Let's see that in Figure 1.1.
Partial class and compiled class in C#
Figure 1.1 : Partial class and compiled class

Advantages of a Partial Class

Here is a list of some of the advantages of partial classes: 
  1. You can separate UI design code and business logic code so that it is easy to read and understand. For example, you are developing a web application using Visual Studio and add a new web form then there are two source files, "aspx.cs" and "aspx.designer.cs". These two files have the same class with the partialkeyword. The ".aspx.cs" class has the business logic code while "aspx.designer.cs" has user interface control definition.
  2. When working with automatically generated source, the code can be added to the class without having to recreate the source file. For example, you are working with LINQ to SQL and create a DBML file. Now when you drag and drop a table, it creates a partial class in designer.cs and all table columns have properties in the class. You need more columns in this table to bind on the UI grid but you don't want to add a new column to the database table so you can create a separate source file for this class that has a new property for that column and it will be a partial class. So that does affect the mapping between database table and DBML entity but you can easily get an extra field. It means you can write the code on your own without messing with the system generated code.
  3. More than one developer can simultaneously write the code for the class.
  4. You can maintain your application better by compacting large classes. Suppose you have a class that has multiple interfaces so you can create multiple source files depending on interface implements. It is easy to understand and maintain an interface implemented on which the source file has a partial class. Let's see the following code snippet.
    public interface IRegister
    {
        //Register related function
    }
    
    public interface ILogin
    {
        //Login related function
    }
    
    //UserRegister.cs file
    public partial classUser : IRegister, ILogin
    {
        //implements IRegister interface
    } 
    
    //UserLogin.cs file
    public partial classUser
    {
        //implements ILogin interface
    }

Points That You Should be Careful about Partial Classes

There are some points that you should be careful about when you are developing a partial class in your application.
  1. You need to use partial keyword in each part of partial class.
  2. The name of each part of partial class should be the same but source file name for each part of partial class can be different.
  3. All parts of a partial class should be in the same namespace.
  4. Each part of a partial class should be in the same assembly or DLL, in other words you can't create a partial class in source files of a different class library project.
  5. Each part of a partial class has the same accessibility.
  6. If you inherit a class or interface on a partial class, then it is inherited on all parts of a partial class.
  7. If a part of a partial class is sealed, then the entire class will be sealed.
  8. If a part of partial class is abstract, then the entire class will be an abstract class.

Using the Code

I will develop an example that explains how to use a partial class in your project. Suppose you are working with LINQ to SQL in your application. So you create a data context, in other words a .dbml file and drag and drop the necessary tables. Each table creates a partial class in the data context designer file and each table field becomes a property for the table. Suppose you have a "Person" table that has the three fields "Id","Name" and "DateOfBirth" and you want to show the age of each person in a grid view. What will you do? If you add a new column to the table for age in database for the "Person" table then it fails the normalization rule so you should not do that. If you add a new property to auto-generated code, then it will not be mapped to the database. So you need to create a partial class portion in a separate source file that has the "Age" property. This "Age" property calculates the age of the person when you bind a person list to the grid view. Let's see each step-by-step.
  1. Create a "Person" table in the database.
    You need to create a person table in the database that has the three fields "Id","Name" and "DateOfBirth". The "Id" field is the primary key.
    CREATE TABLE Person
    (
    Id int identity(1,1)primary key,
    Name nvarchar(50),
    DateOfBirthDate default getUtcDate()
    ) 
  2. Create a web application from Visual Studio.
  3. Right-click on the project in the Solution Explorer, then go to "Add" and click on "Class".
  4. Choose "LINQ to SQL Classes" from the list and provide the name "Person" for the DBML name. Then click on "Add".
  5. Drag the User table from the database in the Server Explorer and drop onto the O/R Designer surface of the "Person.dbml" file.
    Person Entity
    Figure 1.2: Person entity
    Now you can open the "Person.designer.cs" file. In the file, the "Person" partial class has been created for drag and drops a "Person" table from database on O/RM surface.
  6. Create a partial class part that has the "Age" property to calculate the age. This file is named "PersonExtension.cs".
    using System;
    
    namespace PartialClassExample
    {
       public partial class Person
        {
            public int Age
            {
               get { return Convert.ToInt32(System.DateTime.UtcNow.Date.Year - _DateOfBirth.Value.Year); }
            }
        }
    } 
  7. Create a UI design to show a person's details in the grid view.
    <%@Page Language="C#"AutoEventWireup="true"
    
    CodeBehind="PersonUI.aspx.cs"Inherits="PartialClassExample.PersonUI"%>
    
    <!DOCTYPEhtml>
    <htmlxmlns="http://www.w3.org/1999/xhtml">
    <head id="Head1"runat="server">
       <title></title>
    </head>
        <body>
           <formid="form1"runat="server">
           <div>
               <asp:GridViewID="gridPerson"runat="server">
               </asp:GridView>
           </div>
           </form>
        </body>
    </html>
  8. Write code for the "Page_Load" event to bind a grid view by person list in the code behind file.
    using System;
    using System.Linq;
    
    namespace PartialClassExample
    {
       public partial class PersonUI : System.Web.UI.Page
        {
           protected void Page_Load(object sender, EventArgs e)
            {
               using (PersonDataContext context =new PersonDataContext())
                {
                   var query = from person in context.GetTable<person>()
                                select new
                                {
                                    person.Id,
                                    person.Name,
                                    person.DateOfBirth,
                                    person.Age
                                };
                   var content = query.ToList();
                    gridPerson.DataSource = content;
                    gridPerson.DataBind();
                }
            }
        }
    }</person>
  9. Run the application, you will see the Age column in the grid view that shows the age of each person. Let's see that in Figure 1.3.
    Output

Covariance & contravariant in c#


How to identify Request is of Post /Get with in Controller action

if (HttpContext.Current.Request.HttpMethod == "POST")
{
    // The action is a POST.
}

if (HttpContext.Current.Request.HttpMethod == "GET")
{
    // The action is a GET.}

Saturday, 27 January 2018

Difference between Hash table and dictionary

Hash table-

1) It can hold any types of items like 1,2,test.
2) It exists in System.Collections namespace.
3) Boxing and un-boxing is needed because it holds the values as Object.
4) Performance degraded due to boxing & nonboxing.
5) If take values of an item which are not exist in Hash table returns null.
6) It is threadsafe and non-generic type.

Dictionary -

1) It is generic type and holds value of same type that are defined in dictionary.
2) It exists in System.Collections.Generic namespace.
3) No Boxing and un-boxing is needed.
4) No Performance degradation count.
5) If take values of an item which are not exist in Dictionary throws exception of KeyNotFound exception.
6) It is not threadsafe.

Or,

1. Hashtable is threadsafe and while Dictionary is not.
2. Dictionary is types means that the values need not to boxing while Hashtable 
    
values  need to be boxed or unboxed because it stored the  values and keys as objects.         
3. When you try to get the value of key which does not exists in the collection, the 
    
dictionary throws an exception of 'KeyNotFoundException' while hashtable returns 
    
null value.
4. When using large collection of key value pairs hashtable would be considered more 
    
efficient than dictionary.
5. When we retrieve the record in collection the hashtable does not maintain the order 
    
of entries while dictionary maintains the order of entries by which entries were added.
6. Dictionary relies on chaining whereas Hashtable relies on rehashing.

Binary search to find element 12 and their index

using System;
using System.Collections.Generic;
using System.Linq;
using System.Text;
using System.Threading.Tasks;

namespace BinarySearchTest
{
    public static class BinarySearch
    {
        public static Dictionary<int, int> BinarySearchToFindElementWithIndex(int[] array, int findElement)
        {
            Dictionary<int, int> dictionary = new  Dictionary<int, int>(){ };
            int startIndex = 0; int midIndex = 0;
            int endIndex = array.Length - 1;

            while (startIndex <= endIndex)
            {
                midIndex = (startIndex + endIndex) / 2;

                if (array[midIndex] > findElement)
                {
                    endIndex = midIndex - 1;
                }
                else if (array[midIndex] < findElement)
                {
                    startIndex = midIndex + 1;
                }
                else if (array[midIndex] == findElement)
                {
                    dictionary.Add(midIndex, findElement);
                    break;
                }
            }
            return dictionary;
        }
    }
    class Program
    {
        static void Main(string[] args)
        {
            int[] array = { 1, 2, 3, 4, 5, 6, 10, 12, 20 };
            Dictionary<int,int> findElement = BinarySearch.BinarySearchToFindElementWithIndex(array,12);

            foreach (var item in findElement)
            {
                Console.WriteLine("Find element {0} at index {1}",item.Value, item.Key);
            }

            Console.ReadLine();
        }
    }
}

How IEnumerable,ICollection and IList is different to each other and What's method and properties have?

IEnumerable, ICollection and IList are interfaces in the .Net Framework used the most often. IEnumerable is the base of the ICollection and IList interfaces (and many other). All these interfaces provide various functionalities and are useful in various cases.

IEnumerable Interface

IEnumerable interface is used when we want to iterate among our classes using a foreach loop. The IEnumerable interface has one method, GetEnumerator, that returns an IEnumerator interface that helps us to iterate among the class using the foreach loop. The IEnumerator interface implements two the methods MoveNext() and Reset() and it also has one property called Current that returns the current element in the list.

I have created a class StoreData for holding an integer type of data and this class implements the IEnumerable interface. Internally I have used a linked list for holding the data (you can find the advantages of a linked list from my previous article “http://www.c-sharpcorner.com/UploadFile/78607b/overview-of-linked-list/).
  1. class StoreData : IEnumerable  
  2. {  
  3.     LinkedList<int> items = new LinkedList<int>();   
  4.     public void Add(int i)  
  5.     {  
  6.        items.AddLast(i);  
  7.     }  
  8.     public IEnumerator GetEnumerator()  
  9.     {  
  10.        foreach (var item in items)  
  11.        {  
  12.           yield return item;  
  13.        }  
  14.     }  
  15. }  
In the preceding code I have created a custom storage list in which I can store integers (practically we can store any type of data depending on our requirements). We can use the preceding list as:
  1. static void Main(string[] args)  
  2. {  
  3.     StoreData list = new StoreData();  
  4.     list.Add(1);  
  5.     list.Add(2);  
  6.     list.Add(3);  
  7.     list.Add(4);  
  8.   
  9.     foreach (var item in list)  
  10.     {  
  11.         Console.WriteLine(item);  
  12.     }  
  13.               
  14.     Console.ReadLine();  
  15. }  
The preceding code will display all the values using a foreach loop. Instead of a foreach loop we can also use the following code:
  1. IEnumerator enumerator = list.GetEnumerator();  
  2.   
  3. while (enumerator.MoveNext())  
  4. {  
  5.    Console.WriteLine(enumerator.Current);  
  6. }  
Behind the scenes the foreach loop works as in the preceding code. The GetEnumerator() method is available with a list object since it implements the IEnumerable interface. Then by using the MoveNext() method and the Current property of the StoreData class we can display the data. 

Note
Every collection inside the .Net Framework implements the IEnumerable interface.

Key points of IEnumerable Interface

It provides read-only access to collections. We cannot change any item inside an IEnumerable List. It provides a sort of encapsulation in cases where we don't want our list to be changed.

If we are dealing with some SQL queries dynamically then it also provides lazy evaluation. That means the queries will not be executed until we explicitly need them.

ICollection Interface

The ICollection interface is inherited from the IEnumerable interface which means that any class that implements the ICollection interface can also be enumerated using a foreach loop. In the IEnumerable interface we don't know how many elements there are in the collection whereas the ICollection interface gives us this extra property for getting the count of items in the collection. The ICollection interface contains the following,
  • Count Property
  • IsSynchronized Property
  • SyncRoot Property
  • CopyTo Method
The Count property is used for maintaining the count of elements in the list whereas the IsSysnchronized and SyncRoot properties help to make the collection thread-safe. The CopyTo method copies the entire collection into an array. 

The generic version of this interface provides Add and Remove methods also. 

IList Interface

The IList interface implements both ICollection and IEnumerable interfaces. This interface allows us to add items to and remove items from the collection. It also provides support for accessing the items from the index. This interface has more power than the preceding two interfaces.

The IList interface contains the following,
  1. IsFixedSize Property
  2. IsReadOnly Property
  3. Indexer
  4. Add Method
  5. Clear Method
  6. Contains Method
  7. Indexof Method
  8. Insert Method
  9. Remove Method
  10. RemoveAt Method
The IList interface has one indexer by which we can access any element by its position and can insert an element and remove an element at any position.